YOGA FIT

ENERGIZING THE BODY AND MIND
By HAROLD MONRICKLE
More and more men are discovering the power of yoga. What was once viewed as a woman’s workout, men are now signing up for classes, teaching classes, and utilizing the power of yoga in their everyday lives for dealing with stress, mental health, and overall body health. I must admit that I was skeptical about yoga, before I began incorporating various poses into my everyday workout routine, I thought of it as a lot of painful bending and moving. While visiting my gym one day, I didn’t really feel much like lifting weights, so I opted to run a few miles on the treadmill, I happened to look towards the gym’s studio and saw people carrying rolled-up yoga mats, headed there. I stopped jogging and followed them into the class, it was a yoga class, so I decided not to observe and not join in. The instructor was a man, he started the class by saying “do not pressure yourself into posing, if you are unable to get it, be grateful for the attempt, continue trying and you will get it in time. There are no judgments here, we work in our own space, not competition.” I signed up for the next class, when I arrived at the gym the next day, I was eager and nervous. I explained to the yogi (a person who is proficient in yoga) that I was a beginner and if I could secure a spot in the back of the class so as not to embarrass myself. He smiled and touched my shoulder, and said “ If being in the back makes you feel comfortable, then go where your comfort takes you.”
The class began, he started with warmup poses, and I struggled to do the most basic poses. After wobbling I gave up on the pose, the yogi continued to talk the class through the poses, he walked over to me, and gently assisted me with my balance. After class was done, he gave a closing meditation as we lay on our mats. When the class was over, I walked over feeling like totally embarrassed for my wobbling and thanked him for helping me with my balance, he smiled and again reminded me that yoga is not a competition, it is about connectivity between the body and mind. When I drove home I could feel that my body was a lot less tense, and my mind was clearer than it had been for days. The benefits of using yoga in my daily life have helped me reduce stress, allowed me to make better decisions, budget my time properly, and become more healthy. I am not saying that yoga is the right fit for everybody, because some people may find it to be a bit taxing on their body, however, I do encourage those who have not tried it or is curious about it to try with a few basic beginner poses, and afterward see how you feel about incorporating those poses into your everyday routine. Yoga can help you find the right balance for your health, body, and mind. Here you will find some of the yoga poses I do every day to energize me and help me get through my day.
MORNING routine
Here are some beginner-level yoga poses I do to help me start my day off right, try doing these poses to get your day off to a great start.
DEEP STRETCH

Image courtesy of Unsplash | Photographer: @balu_gaspar
*Caution: if you have a recent knee(s) injury, suffer from back pain, and or have arm issues please modify your posing accordingly, and if you feel pain or tightness this is not a sign you are doing it right, please stop immediately and seek your doctor’s advice.
Here is a ten-minute morning stretch routine if you are short on time, but want to get a good stretch in for the start of your day.
Child’s Pose (balasana)-This pose is used to relax the body and mind.
Begin on your hands and knees
Focus on your breathing, center your thoughts on the flow of your breathing, and allow it to slow down.
Sit up completely straight, think of lengthening as you adjust your spine up through the crown of your head. Use your sitting bones to help you adjust your body upright.
Keep your hips tight and your thighs close together
On an exhale, slowly lower your body forward towards the floor, as you bend forward, stretch your arms straight in front of you, and lower your head, keep your forehead pressing gently on the floor.
As you are bowed forward, press back keeping your buttocks on the heels of your feet and spread your fingers wide, and rest in this position for a few breaths.
Soften your face, soften your jaw, and just relax in this pose with your eyes closed and slowed breathing for a few minutes.
Allow any tension that you feel in your body to drain away through your outstretched open fingered hands.
Release the pose by slowly recoiling back up to a seated position.
Keeping your slowed breath repeat this mantra: “I am worthy, my day will be what I choose it to be, and I will walk in happiness”
There are modifications you can make to child’s pose, for example:
If you find it difficult to comfortably rest your buttocks on the heels of your feet, then grab a thick towel, roll it up into a cylinder, and place it between your buttocks and the heels of your feet. This will allow for your hips to be more relaxed.
If you are having difficulty breathing while bowed forward, then spread your knees apart to allow for your stomach space and your chest to open which will allow more air into your lungs.
If you experience knee discomfort, then place a pillow underneath your knees to help elevate any pain you may be feeling.
Remember, do not force or strain your body to do this pose, listen to your body, and if you feel any discomfort or pain just allow your body to be comfortable and stay where you are in the pose. Be grateful for the attempt to do this pose, as my yogi said, yoga is not a competition, do not look at others in a gym or open area, a video, or social media to do what you see, just breathe and be happy that you are starting YOUR journey in yoga.
SEATED STRETCH

Image courtesy of Unsplash | Photographer: @bennmcguinness
*Caution please avoid his pose if you have a back, neck, and or knee injury. This pose will allow you to stretch your muscles, however, if you feel any pain then stop immediately, as I stated before if you feel pain it does not mean that you are doing it right. In the modification, if you choose to use a strap, please do pull yourself forward too hard, as this may cause a strain on your back and neck leading to injury and discomfort.
HEAD TO KNEES POSE (JANU SIRSASANA)
When I was a schoolboy I hated going to P.E. (physical education), because my gym teacher was strict, from making sure that we wore our gym clothes, to us running around the track in hot weather. He did this generic exercise he called: head, shoulders, knees, and toes and I thought I looked ridiculous doing it standing up. In yoga, this pose utilizes the same body parts just from a seated position. Stretching the hamstrings, lengthening the spine, strengthing the back muscles, and massaging the abdominal organs are just some of the health benefits of this pose, but this pose calms the central nervous system, reduces stress, and relieves anxiety and mild depression.
Sit up straight, both legs stretched in front of you, shoulders back, chest open, and toes pointed upward and spread.
Using your hands, adjust your sitting bones (the buttocks) so that you are anchored and sitting firmly on the floor.
Bend the knee bringing it inward toward your inner thigh (use whichever foot you like to start, as you will be alternating each leg)
Center your torso over your extended leg, and begin to bring your torso forward to your leg by tipping the pelvis, as your hands extend to the forward leg, initiate your hips instead of your lower back so that you are not straining the back and neck.
Keep your foot flexed upward while pressing the back of the thigh down toward the floor.
On a slow inhale, bend forward as far as you can go, you have a choice, you can either straighten your spine and long neck, or you can be the top of your head down toward your extended leg this allows your spine to round. Do whatever makes you feel comfortable, and exhale slowly.
Hold the belly in to engage your core, and control your breathing. Stay in this position for a few breaths (5 or 10), then repeat on the other leg.
Modifications:
You can use a rolled towel to place under the knees, a blanket, or a pillow underneath your buttocks. You can also slightly bend your knees if your hamstrings are tight, and if you like you can place a strap around the extended foot, holding each end of the strap using this to help you bend forward.
Conditioning your body to do this pose daily will greatly improve your body and mind. I do this pose before anything else, as it helps get my muscles ready for the day and keeps my mind focused on what matters. So, challenge yourself every day to remain focused on what matters, and while you’re at try to incorporate this pose into your daily routine.
ENGAGING YOUR CORE

Image courtesy of Unsplash | Photographer: @bennmcguinness
*Caution: If you are a sufferer of low blood pressure or high blood pressure, do not raise your arms above your head while doing the Tree Pose (Vrksasana), as this may cause a negative effect on your blood pressure. Only raise your arms and place your palms together in front of your chest (prayer). If you have a knee injury or suffer from knee pain, try leaning against a wall or the back of a chair for balance which can reduce the risk of injury.
Your body is the center of gravity, our center of gravity is the point where the mass of the body is concentrated. The center of gravity for the human body is about an inch below the navel, so that is where we utilize a lot of our core energy. We engage our core when lifting or bending, so having a strong core will help us do overcome a lot of obstacles in our lives that require a good amount of strength. Here are a few poses that will help engage your core, and is great for starting your day.
MOUNTAIN POSE (TADASANA)
This pose is great to improve your posture, by strengthening your legs, helps to establish good spinal alignment, and bringing you to inner awareness.
Stand with your feet hip-width apart, making sure to keep your legs straight, firm, and strong. Be sure and spread your toes apart, this will help with balance and distribute your weight evenly.
Keep your hands straight down the sides of your body, and pull your shoulder blades back a little, this opens the chest and allows for the heart to be open.
Stand straight, engage your knees, tighten the inner thighs by squeezing your thigh muscles, and do not slouch, keeping your spine aligned allows for your body to stretch in a healthy manner.
To extend the spine, inhale slowly, lifting up through the legs as the inhale lifts the rib cage, opening the chest, dropping the shoulders downward, extending the neck, and keeping your eyes and jaw soft.
Modifications:
You can place your back up against a wall, and stand in the pose to provide you with comfort and ease.
While in mountain pose, this keeps the mind quiet and still like a mountain, the core is engaged through breathing and standing straight and is a great way to start your day.
TREE POSE (Vrksasana)
This pose has beginner, intermediate, and advanced levels, so if you are a beginner, here is the simple way to do it, and as you become comfortable try doing the other levels. Again, these poses are all about promoting balance, alignment, and centering. While in this pose you are strengthing leg muscles, ankles and feet, groin, and inner thighs. It also opens up the muscles of the chest and shoulders and stabilizes the core musculature with a focus on the hips and thighs. In this pose, I have found that it calms and relieves stress, improves balance, and strengthens my lower body all while engaging my core.
To begin, stand up nice and tall, squeeze your buttocks, now stand on your right foot, and bring your left heel to touch your right ankle, rest your toes on the ground.
Lift your arms out to your sides, spread your fingers, and slowly inhale and exhale.
As your balance allows, start to left your toes on your left foot off the ground. You may wobble as your body balances, do not become frustrated, simply place your toes back on the ground to help you become stabilized, and then try again.
Keep your focus on the outer right hip, keep your buttocks squeezed, and pull the belly in as this will help you strengthen your core, and allows you to maintain slow inhales and exhales.
Once you have established your balance, with the lifted left foot keep your energy focused on the planted foot and pull the left knee up twisting outward and shifting your left hip to a deeper position. Do this a few times, and then shift to your left foot and repeat.
Modifications:
Use the back of a chair or flat surface (like a table or countertop) and try this pose this will provide you with some stability while attempting this pose.
Once you have mastered this level, then you can move on to bringing the legs up to the middle inner thigh, and then finally all the way up to the highest point of the inner thigh. Do this pose with ease, not with force, as you will lose your balance a few times attempting this pose, but the more you do it, the better you will get at maintaining your balance, and before you know it you will be able to pose with very little effort.
WHO’S UP FOR A CHALLENGE?
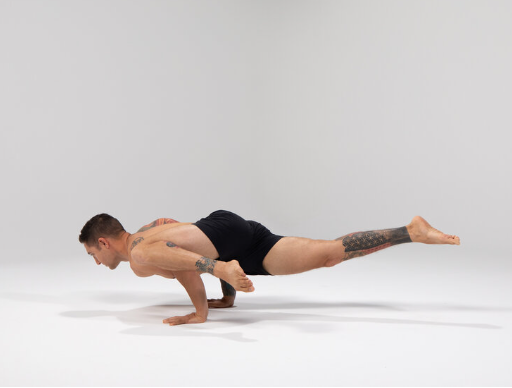
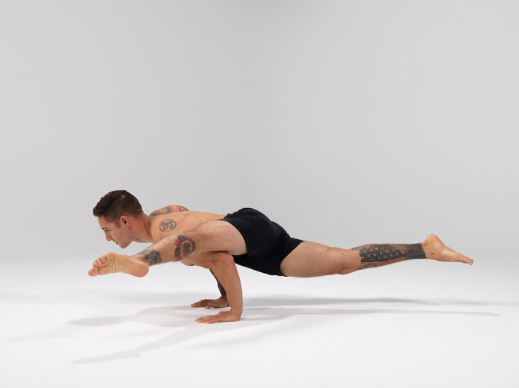
I love a good challenge, testing my ability to do certain things, and stepping out of my comfort zone is what I enjoy most about challenges. I have been practicing yoga for about 20 years now, and there are a few poses that have challenged me over the years. One pose in particular that I recently mastered is called Eka Pada Koudinysan II or the Hurdler’s Pose. This particular pose took me a while to get right, at times I would get halfway into the pose and then lose my balance, or I would get into the pose, but could not hold it for very long. Now, what exactly does the hurdler’s pose entail, well for starters it is an advanced pose for the arms, chest, and legs, it uses your upper body strength, and engages your core abdominal muscles while your legs are split in the air. This pose builds muscle strength in the arms, shoulders, chest, abdomen, core, hips, spine, and hamstrings. Sounds hard doesn’t it, well that’s what I thought when my yogi described it, and then demonstrated the pose with such ease that I walked away thinking man, I can do that. After my first attempt, I was sorely wrong, I went to my yogi to ask for assistance in doing this pose, and he was happy to oblige my request, however, he told me that this pose is more than just building strong muscles and a tighter stomach, it is a builder of self-confidence of body and mind, it brings awareness and connection to the body as you move toward balance, and helps with meditation, because as with meditating it requires focus and stability of the mind. I took his words to heart and continued to practice until I achieved this pose, and now I am sharing this with my readers. So, once you feel comfortable, give this pose a try. This pose teaches a life lesson, and that is there are challenges in life, but as long as you remain focused you can overcome them.

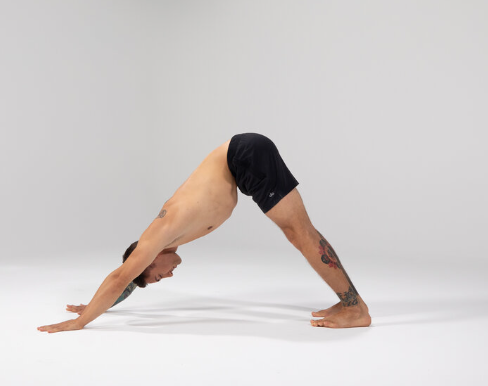
EKA PADA KOUDINYASAN
HURDLER’S POSE II
HURDLER’S POSE II
*Caution: this pose when done incorrectly can cause wrist and shoulder injuries. Do not attempt without support measures in place, use modification techniques to assist with doing this pose. If you have or had a shoulder and or hand injury please do not attempt this pose. Try this pose on a padded floor (carpeted, or with cushions), and if you feel pain in your arms, shoulder, legs, and or back please stop immediately. If you start to lose your balance, then slowly come out of the pose by lowering yourself to the ground, do not attempt to stay airborne, as you could injure yourself attempting to stay in the pose. Pain is not an indicator that the pose is working, and you could seriously injure yourself.
Let’s begin:
Bring your hands down all the way to the front of your mat, spread your feet about shoulders length apart, press your hands firmly into the mat, and lift your hips up and back-(Downward facing dog position)
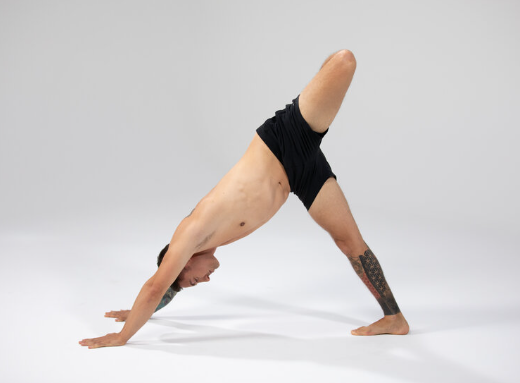
Keeping one leg planted, extend the other leg upward and bent to open up the hip.
Slowly with ease, not force, shift the inner thigh forward toward the outside of your tricep.
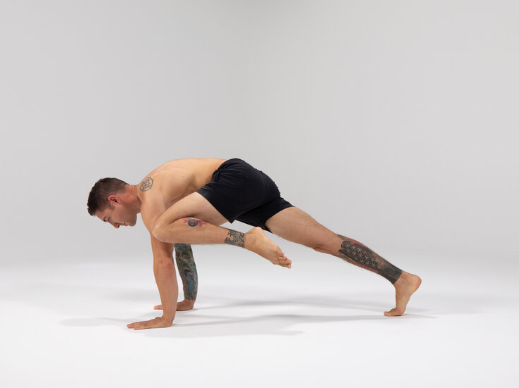
Bending your arms, shift your weight forward into your fingertips, doing this creates a stable base for your raised thigh resting on the back of your tricep.
Slowly, lift your other leg off the ground. Now may take a few attempts, but don’t be discouraged if you are unable to completely lift your leg on the first try or many tries, you will find the right upper body balance to be able to accomplish this move.
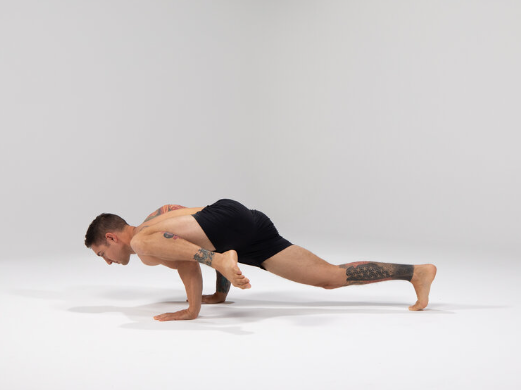
To complete the pose, extend the bent leg resting on your tricep out, and you can either bring your head up looking straight, or you can put your head down without touching the floor.
Modifications:
Try just positioning your inner thigh to your tricep and holding this position, and then switching to the other side a few times until you feel comfortable with thigh bending. Instead of lifting the planted foot, try keeping your bent leg on your tricep, bending your arms underneath your chest, and maintaining your foot down. If you feel strong enough, lift your planted food off the ground and try to hold it for 5 seconds at a time until you can feel your balance taking shape, and then try to hold that pose for longer in 5-second increments. Lastly, slowly extend the bent leg outward, and lean your body down towards the floor, if you need to rest your head on the floor while doing this feel free, just remember to place a pillow or cushion underneath your head area in case you lose your balance and you fall head first.
PRINCIPLED
Yoga teaches us to use all resources, body, and mind through locating our feelings and thoughts from the same place, and teaches us how to integrate these essential human experiences based on 5 basic principles.
Proper exercise-Asana
Proper breathing-Pranayama
Proper Relaxation-Savasana
Proper Diet-Vegetarian
Positive Thinking and Meditation-Vedanta and Dhyana
With each principle, we incorporate into our daily lives comes focus, balance, body awareness, relaxation of the mind, creates mental clarity and calmness and leaves us in a state of positive concentration. Yoga is for all those who seek to create that balance, move with purpose every day of their lives, and enjoy a healthier lifestyle. You don’t have to be a yoga master (yogi) to participate in the practice of doing the various poses, you just have to want to experience something different for a better you. Namaste!

Image courtesy of Unsplash | Photographer: @alonsoreyes
IMAGES COURTESY OF UNSPLASH & GOOGLE IMAGES | PHOTOGRAPHERS:
ALONSO REYES, BENN MCGUINESS, CHRISTIAN BUEHRER, AND
BALU GASPAR
Images are used for illustration purposes only.
Image photographers and Unsplash are not affiliated with and do not endorse DHMICON.COM, its writers, or blogs.
Contributing Writer: Harold Monrickle
An accomplished photographer and writer in the fashion industry for over 20 years, Di Marco has created works for some of the most popular and well-known fashion houses domestically and internationally.


